
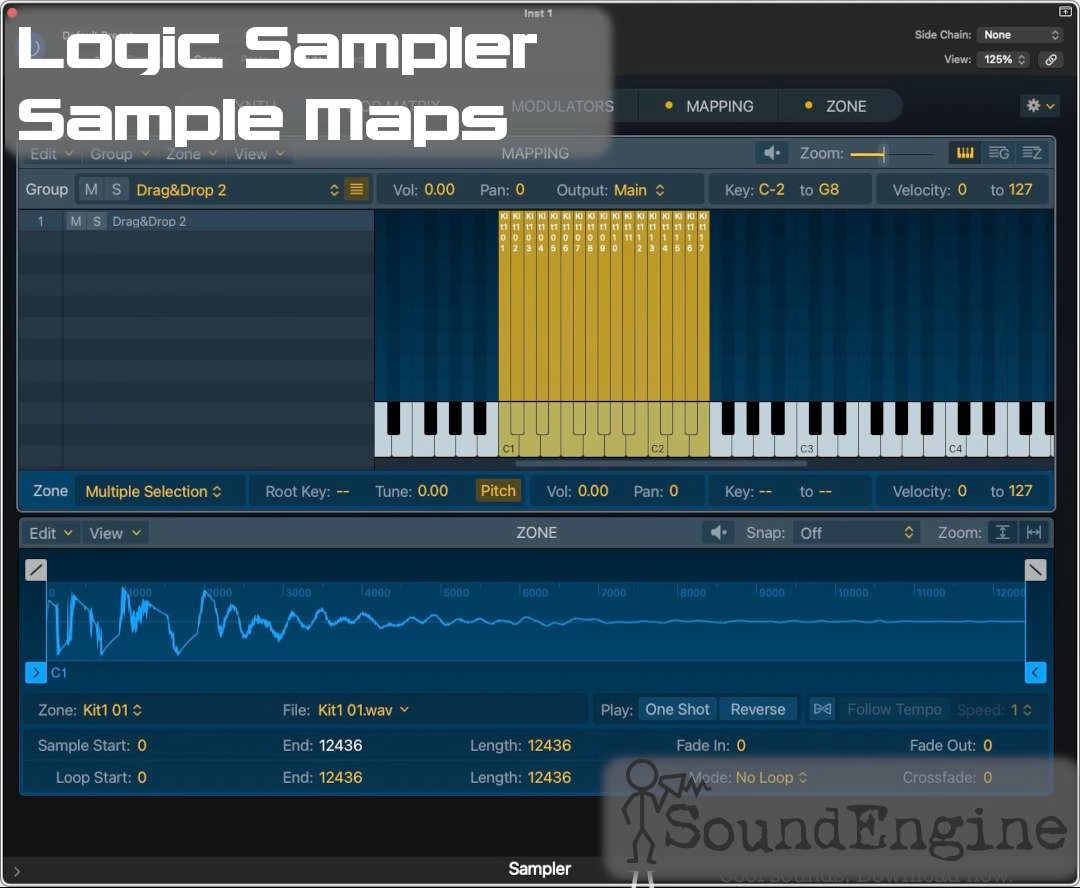
There are many things to keep track of when you are mapping samples. Correct root keys, key ranges, velocity ranges, and tuning, to name a few. Keeping track of all of these things, and more, can make the idea of making your own sample packs a bit intimidating – and we haven’t even talked about looping samples yet! Fortunately, Logic Sampler mapping is relatively easy compared to the old days of mapping on an ASR-10 or an AKAI S1000. There is plenty of visual feedback and automation to simplify things. Let’s take a look at mapping in Logic Sampler and learn some basic workflows.
What is Mapping?
Sample mapping is the work of taking digital audio recordings (samples) and arranging them for playback, with parameters such as note number and velocity range, from a MIDI controller. This is the same definition for either mapped synthesizer samples or drum samples. Each element within a sample map has a root key, key range, and velocity range.
There are typically other parameters for each sample, such as tuning offsets, playback type, and more, but these three are the baseline parameters. If you take a group of samples and arrange them for playback with just those three, you have a sample map. In Logic Sampler, a sample map consists of two groupings: Groups and Zones. A Zone is the “atomic” level of a sample map – the sample file, a root key, a MIDI note range, and a velocity range. Several Zones can be set to act together as a single unit or Group, which has additional settings.
For this tutorial, we’ll focus on a single group with multiple zones. In future episodes, we will learn what we can do with multiple groups within a Sampler preset, but for now we’ll keep it simple. We will also dive into the myriad parameters within a Zone in future posts. There are a lot of them.
The long and the short of it is: Logic Sampler has one of the most complex and in-depth sample-mapping capabilities in the software sampler category, in my opinion. So much so that I typically lay out sample maps first in Logic Sampler before moving to other formats like Halion or Kontakt.
Let’s Start Simple
We will use the tools in Logic Sampler to create a sample map. Note: This will be a real-world example. I’m going to take a set of samples from my hard drive, shared here, and walk through the process of mapping them. Whether you are searching the Internet or coming across samples on your hard drive, most groups of samples you find aren’t labeled properly with the root note name or number in the file name, and they may not be looped.
Step-by-step:
1. Download the ZIP file of samples here. You will find a group of samples in a folder named HOLLOW ORG – a set of wavetable organ samples.
2. Open Logic and create a software instrument track with Sampler → Stereo as the instrument
3. Make sure that the Mapping Pane is enabled
4. We will check out all of the options for mapping
a. Select all of the samples in Finder. Drag them all to the Sampler window, towards the Edit pane Enables bar (Synth, Mod Matrix, Modulators, etc.)
b. What you should see is the Edit Pane Select disappear, and four options are presented: Chromatic – Zone Per File, Chromatic and Optimized – Zone per File, Zone per Note.
d. Another option is to drag them to the blue area with the message “Drag audio file here.”
e. Before releasing the mouse, move the mouse in this area vertically. As you move up and down, note that the key ranges assigned to each sample expand and contract. This tool comes in handy from time to time.
5. For this tutorial, move the mouse towards the bottom of the pane, where each sample has a single note range. Release the mouse. Now, we should have a map that looks something like this:
6. We’ll now map the samples to their correct keyboard locations via pitch detection, which is built in (although, as you will see, not perfect) in Logic Sampler.
7. With all zones/samples selected, go to Zone → Automap → Automap using Pitch Detection.
8. You’ll now see a key map that looks like this, which is mostly right, but an adjustment needs to be made.
9. Select the sampled Zone named Hollow Org.1 by itself – only it will be gold colored, and all the other zones will be blue.
10. Adjust key range, Move Hollow Org.0 → C0
11. Adjust Hollow Org.3 velocity range to 0 to 127
In this specific example, the fastest way to map it was to use automatic pitch detection. The pitch detection didn’t get everything right, and sometimes that’s the way it goes. Still, the other five samples were mapped correctly.
Experiment with the other four modes of automatic mapping – the methods provided when you drop the samples at the top of the pane. These provide different results, and with these samples, more incorrect ones that require more tweaking after completion.
There could be a number of reasons for this, including the approach taken in the design of the pitch detection algorithm, or my choice, the fact that the C0 sample has some harmonics similar to the 3 sample, and the algorithm just determined they were the same note and stacked them.
In any case, a lot of time can be saved by using the tools Sampler provides.
Drum Mapping
Drum mapping presents its own set of challenges, but perhaps fewer mapping options are needed when mapping drum samples to a keyboard in Sampler. Generally speaking, drum samples are mapped 1 drum per key, perhaps with multiple hit velocities or round-robins. In our initial look at drum mapping, we’ll assume that we are mapping single drum hits, 1-to-1, to a key on a MIDI controller. That said, it’s remarkably helpful to know the key map before we drop the samples onto Sampler. This can be managed in a couple of ways:
1. Append each sample name, before the extension, with the MIDI Key number or note that we want the sample to be mapped to, or
2. Drag and drop the samples one at a time.
Step by Step:
If you are mapping the six drum tones in an Arturia DrumBrute Impact for example, it’s probably simpler just to map them one at a time. If you have 40 drum hits that you sampled from a vintage M1 or other workstation, you may want to take a moment to add that MIDI note to each name. In something like Finder on MacOS, it’s not that hard or time-consuming, and there are utilities that can assist with bulk renaming. In our case, I’ve included a set of samples that are somewhere in the middle of 6 and 40 – 17 samples from the Wayback Machine. Let’s download them here (if you haven’t downloaded them yet) and get started:
1. Select the “Gear” icon in the upper right of the Sampler window and choose “New Mapping” to clear out our previous work.
2. Select the 17 samples in Finder and drag them above the mapping pane to generate the “Chromatic” auto-mapping function, and select Zone per File. This maps each drum hit onto a single key starting at C1. Pitch detection won’t help us with drum samples.
3. If that doesn’t suit you – let’s say that you would like a few pitches available for each hit to choose from- then drag the 17 samples into the blue section of the Mapping pane, and before letting go, move up or down vertically with your mouse to change the width of the mapping range for each sample.
Mapping drums is much easier – right? Where we are now is a place where all 17 samples are mapped in numerical order, where we dropped them. If you wanted them mapped in a different order, you could select samples in the Mapping pane and drag them around to suit your needs. There’s another option, too – before you drag any of the samples into the Mapping pane, rename them and include the desired MIDI note names in each file name. “Kit 1 10 C2:” for example. After the samples are dragged into the Mapping pane, you can then use the Automap function (Zone → Automap → Automap using Root Note from Audio File Names to remap them.
There is always a trade-off between the time you want to invest up front and immediate gratification when using tools like mapping in Sampler. I’ll just note that this particular pair of key maps has been on my hard drive for a while and still lacks MIDI note names in their filenames.
Saving the samples as a preset
Now that we have a key map, we’ll need to save it as an instrument to recall later. Too easy. Select the pulldown that says Default Preset at the top of the Sampler UI, scroll down to Save As …, enter your filename, and it’s saved. The default save location is within the Logic Project hierarchy that’s been created, or you can navigate to another location where you keep Logic Sampler instruments.
A Map to Sound Design
Creating maps of samples is a key element in sound design. Maps in Logic Sampler are a fundamental building block to creating instruments, and creating your own instruments as you are inspired gives you ultimate control over your signature sound. We’ve started with just two groups of disparate samples found on a hard drive and used the tools within Logic Sampler to shape them into a playable instrument.
In future posts, we will dig even deeper into the capabilities of Logic Sampler, as we’ve barely scratched the surface of what Groups and Zones can do within the Mapping pane. In SoundEngine’s Sampler Owner’s Manual, I aim to share my experiences and knowledge of using this remarkable native tool, which, in my opinion, is one of the most powerful resources in Logic Pro.
I encourage you to join our mailing list – that will get you a discount coupon to use anywhere on SoundEngine.com, for Logic Sampler sounds or not. We’ve got similar sets of tutorials for Nils’ K1v, a Kawai K1 emulation, as well as Dexed and MIDI Sysex messaging and management. I hope you’ll join us.
In the meantime, thank you for reading, and I hope this post has given you some creative horsepower for your tunes.
Leave a Reply
You must be logged in to post a comment.